What To Expect During Your Online Bike Fit
By Jesse JarjourBelow we will examine the results of an online bike fit.
Step One: Recommendations
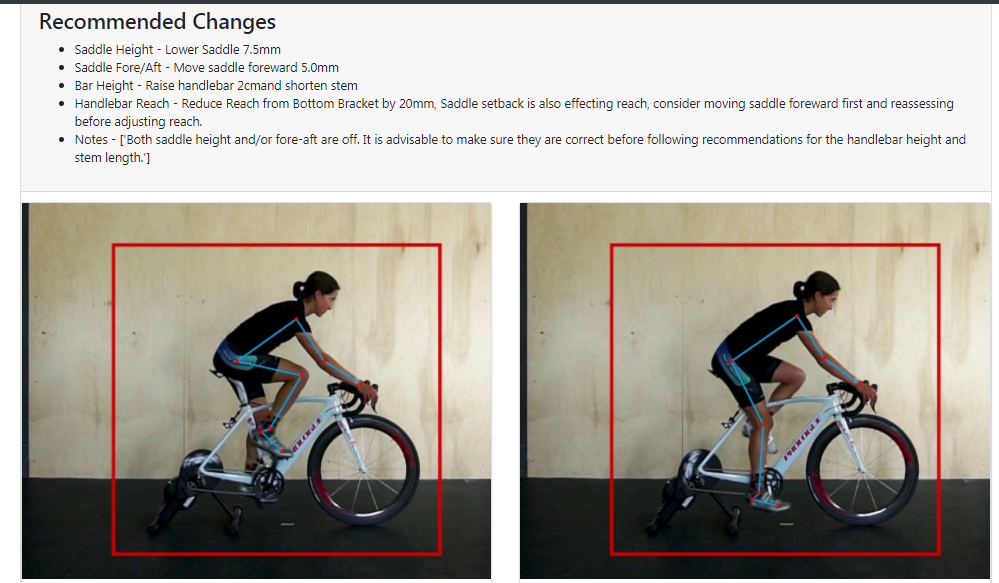 The first thing you will see when you upload a video is a few recommended adjustments as well as some imagery. We will start by going over the adjustments.
The above rider has been told to lower their saddle, move their saddle forward, raise their handlebars and shorten their reach. Pretty big adjustments. There is also a note flagged saying to do the saddle adjustments and re-measure before doing the upper body adjustments. This is because lowering the saddle and bringing forward will have a similar to the upper body as raising the handlebars and bringing them back. Always remember to do the saddle adjustments first, then reevaluate before doing the cockpit adjustments.
Step Two: Imagery
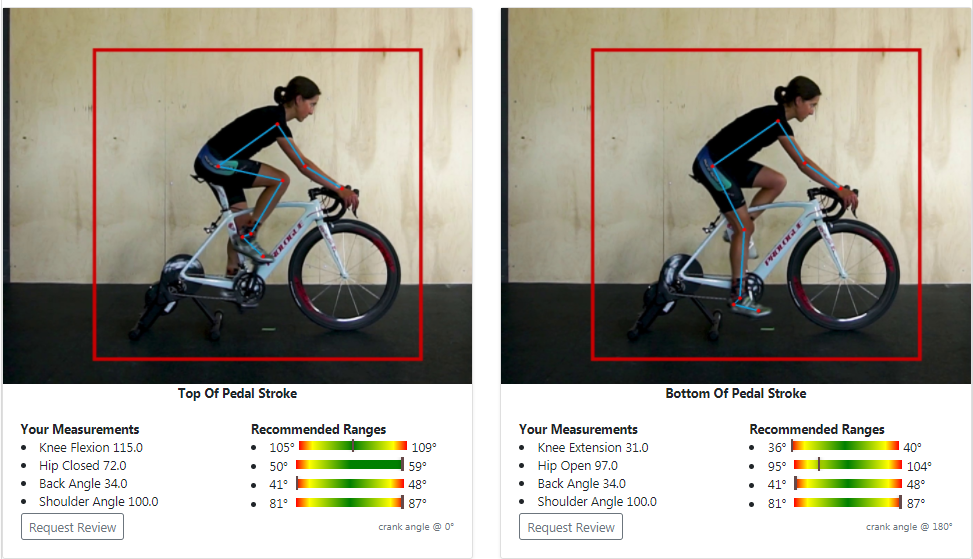 In general you can follow the recommendations above and you’ll get into a good starting position. However if you want to really customize your position you can use the data in the four detailed images to really dial in your position. For instance, say you are racing and you want to be a bit more aggressive. You’ll typically have around a 5 degree range of acceptable back angles considering your flexibility. This would allow you to take your back angle a little lower and potentially get some free speed. In the example above our rider is already out of range on her back angle so raising her handlebars will help get that back angle into range.
Step Three: Imagery part 2
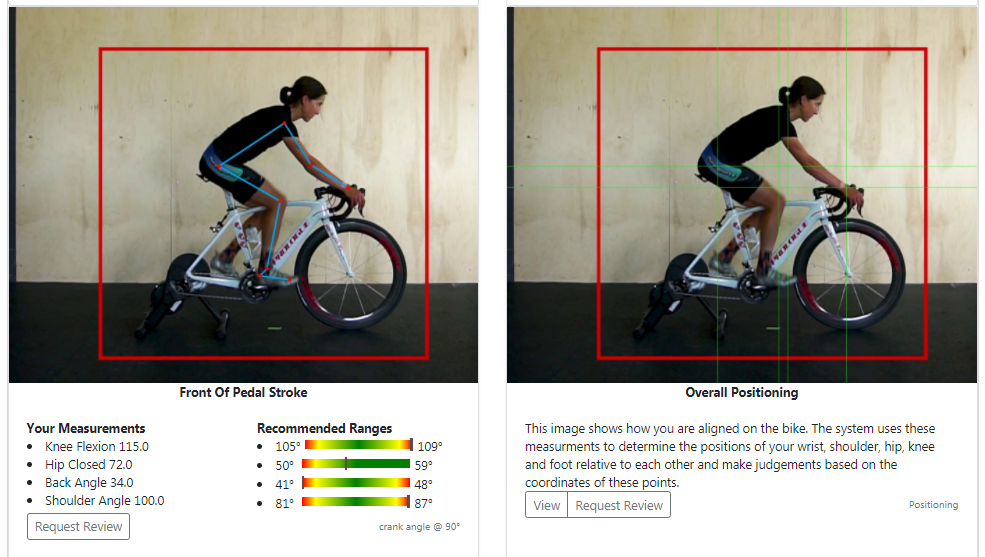 The final two images show a bit more detail of how you pedal your bike. The image on the left shows your “knee over pedal spindle” which is an old fashioned way of determining fore/aft positioning of the saddle, and the image on the right shows the same position but with horizontal and vertical lines identifying hip, shoulder, knee, and wrist. These can be helpful to determine where you are on the bike relative to different body parts.
Often we get asked how we determine “fore/aft” seat placement. At the time being we don’t disclose that measurement as it is determined with a proprietary algorithm which has proven to be significantly better than either knee over pedal spindle or center of mass, two old school methods for determining bicycle fore/aft positions.
Step Four: Video
Finally you will have a video representation of your fit. This will separate the wire frame from your body and give onscreen measurements for you or your fitter to observe. Don’t worry too much if the tracking seems a little jumpy, or if tracking is lost for a frame or two, we use a smoothing algorithm to ensure more accurate results. However if you notice the motion tracking consistently being off, or it unable to track certain parts of your body we recommend changing your lighting conditions or the color of the kit you are wearing and uploading a new video.
Jesse Jarjour
Jesse's cycling journey was destined to end in bike fitting after first being sold a bike that was two sizes too big. The resulting chronic discomfort and related injuries transformed into a passion for finding the right riding position. The improvement he experienced after his first professional bike fit inspired a career change from economics to bikes, fuelling a quest to help others unlock the joy of cycling.
Ready to get started?
Athletes from around the world use MyVeloFit to improve their cycling position.
Whether you are a veteran or new to the sport, MyVeloFit can help you improve your position.
