Time trialing is one of the most accessible types of bike racing. Not only is it typically less dangerous than pack riding, Time Trialing can be more rewarding since the results are directly tied to your personal performance that day whereas there are more factors at play in other types of group racing.
While most people get started at local club level time trials, which generally don’t pay much attention to bike setup, as you advance in the sport you will likely be required to have your bike setup checked to ensure you fall within the UCI’s strict regulations. If your bike doesn’t fall within these regulations you will be required to adjust your bike on the spot. Because changing your fit can have significant impacts on performance we recommend you ensure your position is compliant sooner rather than later. Better safe than sorry.
This post and infographic will provide a simple guide on how to measure and set up your time trial bike for UCI regulations.
Because the UCI regularly changes their rules we will update this post occasionally to reflect any changes to the UCI regulations. This post was published on March 15th 2023, and in theory should be accurate until December 31st 2023.
Why Does The UCI Have These Regulations?
Simply put, who knows? There are many cycling governing bodies which don’t follow rules as strict as these for example Cycling Time Trials (CTT) – the governing body for most Time Trials in England, Scotland and Wales – and Ironman the international triathlon organization both have very brief notes on the bicycle setup requirements, mostly related to safety.
On the other hand the UCI has an entire 78 page technical document which has restrictions on how almost every piece of the bike must be set up. The assumption is that the UCI has imposed these recommendations for both fairplay and safety. While there is a certain level of consideration for fair play by having every rider in somewhat of a similar position; these regulations also serve to stifle innovation and handicap certain body shapes.
What Events Measure For UCI Compliance?
Typically most club level time trials wont measure for UCI compliance. It is more common for your frame and position to be checked as you get into regional level events or any events that award UCI points. Because you may never know ahead of time if your position may be checked for compliance we recommend you maintain a UCI compliant position. While it may be intimidating to measure and set up your bike it’s far better to have your bike in a compliant position at all times. It can be incredibly stressful to have to adjust your bike minutes before your event and have to race in a position you aren’t used to.
What Is Covered in the UCI Regulations?

The UCI’s regulations on Time Trial bikes cover both the manufacturing of the bike, and the individual’s position. This post will focus on the rider’s position. Simply put, if you don’t have a UCI approved sticker on your bike – indicating that it falls within the UCI’s manufacturing requirements – it will likely already fail the inspection. So be sure to look for one of these before you get started.
The UCI has provided a somewhat helpful (though complex) infographic on the position requirements. However, they can still be difficult to interpret and apply so we’re created this guide to simplify the process”.
How To Measure Your Bike

Race officials will use a special jig to measure your bike and many bike shops and mechanics will have specialty tools that make measuring easier. This post will help you get accurate measurements without any specialty equipment.
Step 1: Find What you’ll Need
- Measuring Tape
- Pen/Pencil
- Optional – digital level (most smartphones have a level app)
- Your height in centimeters
Step 2: Balance your Bike
- Find a corner where you can place the rear wheel of your bike up against one wall and balance the bike against the other. Make sure your bike isn’t leaning excessively to balance.
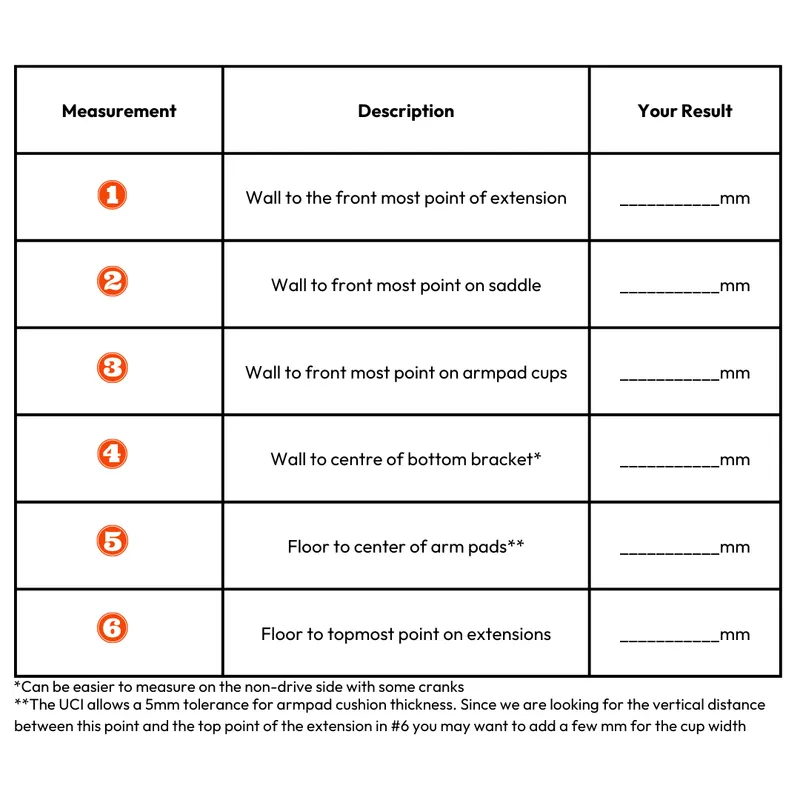
Step 3: The Six Measurements
- From the wall to the furthest point on the aerobar extension. (If you have mechanical shifting you’ll need to place the shifter in the position that is the furthest away horizontally)
- From the wall to the front tip of the saddle
- From the wall to the front most point in the aerobar
- From the wall to the center of the Bottom Bracket. (On some cranks this can be easier to measure on the non-drive side)
- From the floor to the bottom of the center of the arm pads
- From the floor to the highest point on your aerobar extension. (If you have mechanical shifting you’ll need to place the shift lever in the highest possible position.)
Optionally, you can use your phone to check the angle of your saddle and arm pad cups. We call this optional because the current regulations are actually quite generous to the point that it is actually hard to be outside of them. The saddle must be ±9° and the arm pads must be ±30 degrees.
Step 4: Do the Math
There are four key measurements you need to check if your bike is UCI legal. They are:
- Saddle Setback
- Extension Reach
- Extension Length
- Extension Height
Saddle Setback
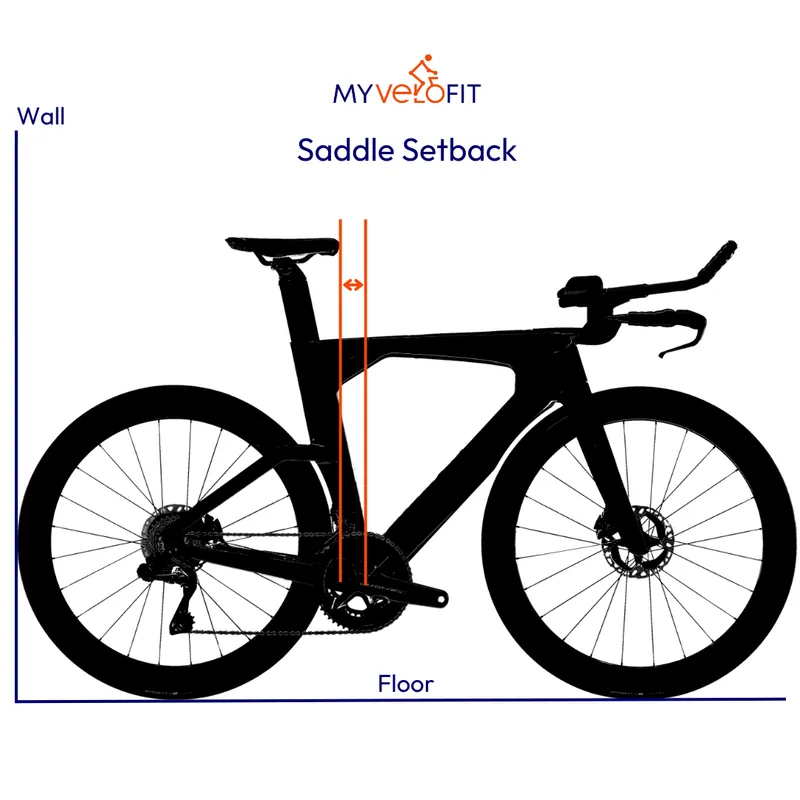
The horizontal distance from the tip of the saddle to the center of the bottom bracket. To get this measurement you’ll subtract #2 from #4. This measurement is important because the rest of the regulations change depending on this measurement. There are two separate measurement charts: One if the saddle is between 0mm (directly above the bottom bracket) and 50mm behind the bottom bracket and one for greater than 50mm behind the bottom bracket. It is forbidden to have the tip of your saddle in front of the bottom bracket. See charts below.
Extension Reach

The horizontal distance from the center of the bottom bracket to the furthest point of the aerobar extension. If you are using mechanical shifters they must be shifted to the furthest point away from the bottom bracket horizontally. To get this measurement you’ll subtract #1 from #4.
Extension Length
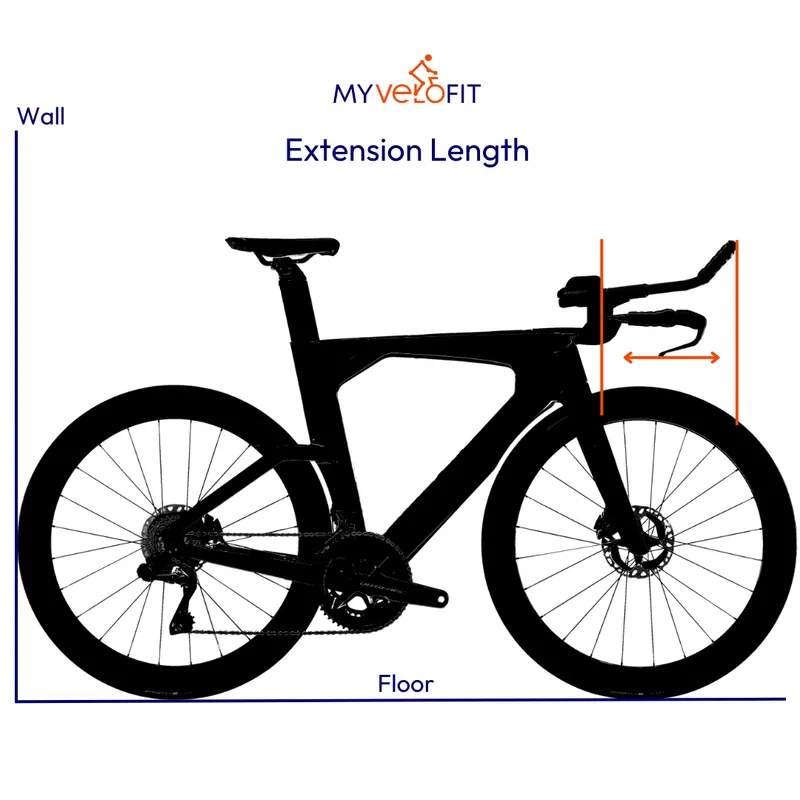
The horizontal distance from the furthest point of the aerobar extension to the furthest point of the arm pad cup.
To get this measurement you’ll subtract #1 from #3
Extension Height

The vertical distance between the midpoint of the arm pad cup to the highest (or lowest if your extensions are below the arm pad cup – but in reality nobody is setting up bikes this way) point on the aerobar extension. If you are using mechanical shifters you’ll need to adjust the shifter so it is at its highest point. To get this measurement you’ll subtract #5 from #6.
Having completed the above you’ll be left with the following four measurements:

Step 5: Check Your Position
To check if your position is compliant you can reference your measurements against the regulations in the charts below. You’ll first need to determine which category you fall in based on your height and the chart below.
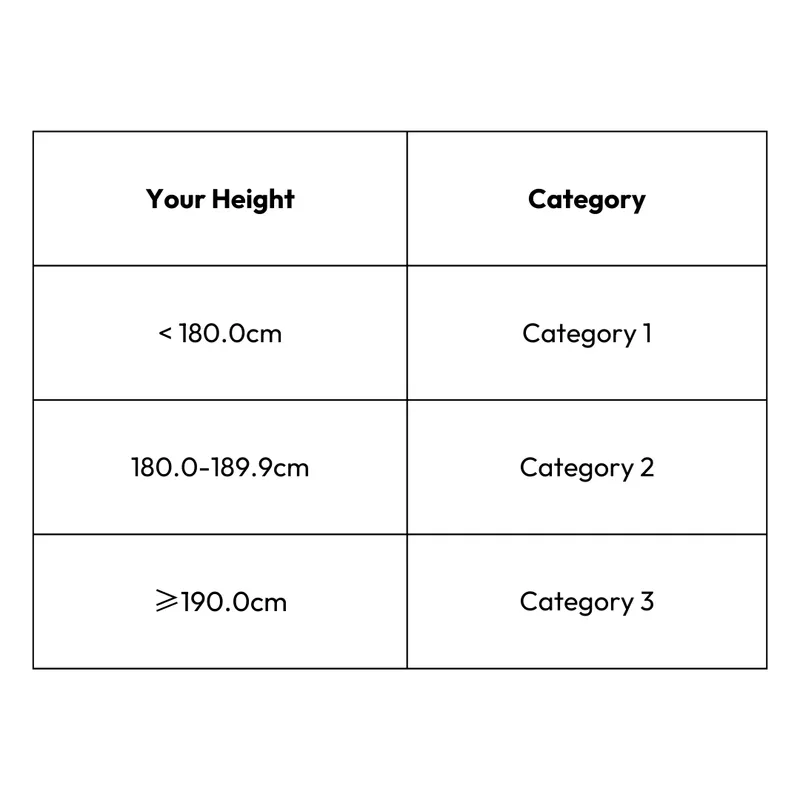
Keep in mind that if you are above 180cm you will need to fill in a form on the UCI’s webpage , and print a sticker to be placed on the frame . If your saddle is less than 50mm behind your bottom bracket you’ll use this reference:

Otherwise you’ll use this one:

Tips and Tricks
We typically don’t like making generalized statements about fit and aerodynamics but it’s worth considering that these restrictions are partially in place to level the playing field. It stands to reason that starting as close to the maximum allowed lengths as possible for extension reach and extension height may result in a performance advantage.
Starting with a ≥50mm saddle setback will give more options for how you set up your bike. Being in the forward position (0mm to 50mm setback) means all riders, regardless of height will have the same allowable extension reach (750mm, not long especially if you are a taller rider). By setting your saddle setback to ≥50mm you’ll be able to adjust the overall reach of your bike substantially.
As mentioned above if you are over 180cm you must fill out this form on the UCI’s website before your event and apply the correct label to your frame otherwise you will be required to be within the Category 1 forward position (saddle setback 0 mm to 50mm) measurements regardless of saddle position. This means you will have a maximum Extension Reach of 750mm and Extension Height of 100mm. The UCI official can potentially measure the rider on site but is not obliged to.
Complete Infographic


