Your bike’s saddle position is the foundation for the rest of your fit. While getting the height and fore-aft positioning of the saddle ensures your overall position is off to the right start, the tilt of your saddle can often have the biggest impact on comfort if not set correctly. Many cyclists incorrectly start shopping for new saddles to improve comfort when saddle positioning can often alleviate issues.
This post will outline our recommended process for setting up your saddle tilt, to make sure you’re getting the most out of your fit.
What is Saddle Tilt?
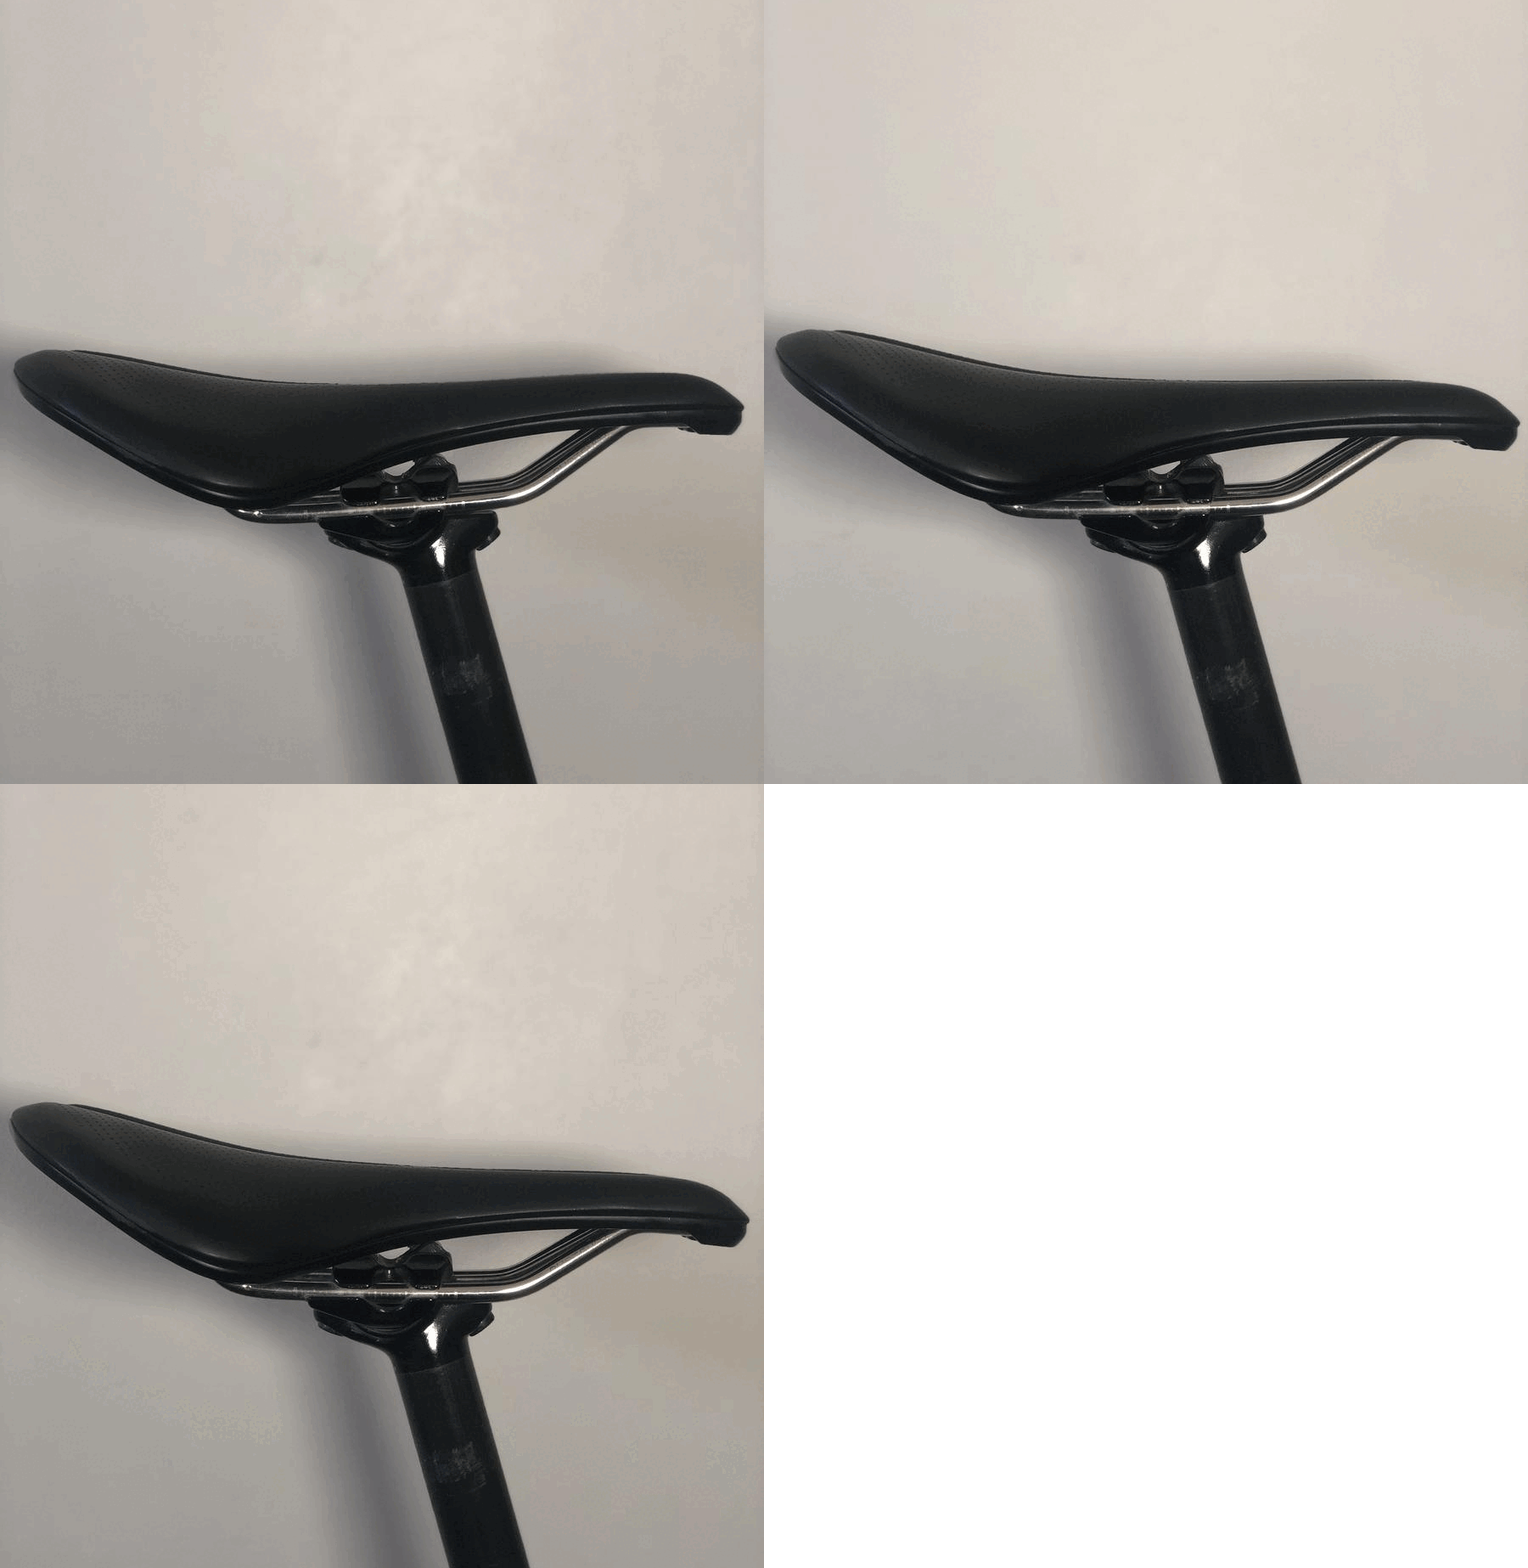
Saddle tilt refers to how level (or not) your saddle is front to back. Tilt is typically referred to in degrees with positive measurements indicating a “nose up” position and negative degrees indicating a “nose down” position.
Saddle tilt ranges
While every seatpost will have a slightly different way it adjusts saddle tilt, there are typically one or two bolts (often the same as those used to install the saddle) which control the tilt.
For one bolt system, the bolt is loosened and some form of friction is usually used to hold the saddle at its tilt.
For two-bolt systems, controlling tilt is often easier, as micro-adjustments can be made by tightening/loosening both the front and rear bolts depending on the direction of tilt needed.
Steps To Setting Saddle Tilt
Setting saddle tilt may sound a bit daunting, but it should actually be quite simple. We think there are three key steps to finding a great saddle position, including your tilt.
Level your saddle
Set Saddle height and Fore/aft
Set Saddle Tilt
Below we’ll dig into each to give you a better idea of what to do and what you should be looking for.
1. Level Your Saddle
Any time you’re thinking about your saddle position, you should start with a level saddle. While a perfectly level saddle may not end up being your final position, it should be where you start (especially when sorting out your saddle height and fore/aft). If you’re currently riding with a high degree of tilt on your saddle (positive or negative), the need for this is likely caused by other issues in your fit. Starting with a level saddle serves as a fresh start to establish a good position on the bike.
What is Level?
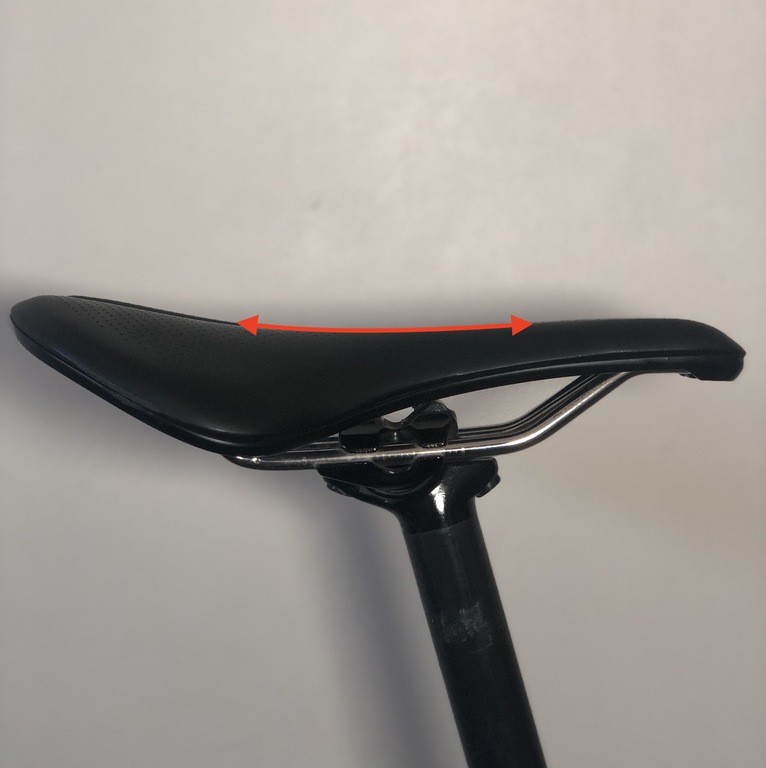
There are all varieties of saddle shapes, and in this case, profiles. Some are nearly completely flat (front to back), while others have various degrees of rise at the rear of the saddle, and similarly noses that taper down. How to measure what is level may not be completely obvious depending on the shape of the saddle. For saddles with flat profiles, it is reasonably clear what level might look like, but with the curvier profiles it’s not quite as simple. To boil all saddles down to one easy approach, the key to starting level is to make sure the part of the saddle you’re sitting on is level. For most saddles this is best represented by the middle third of the saddle.
You can check your saddle tilt quite easily by using a small bubble (spirit) level or the level app on your phone and placing it on that centre third of the saddle. Be sure the ground your bike is on is also level, as you could end up with confusing outcomes if not.
If your saddle is already level move on to the next step. If not, take some time to level your saddle and keep in mind that a little goes a long way. Most of the time you’ll only need a small adjustment to make a daily large change in your saddle tilt.
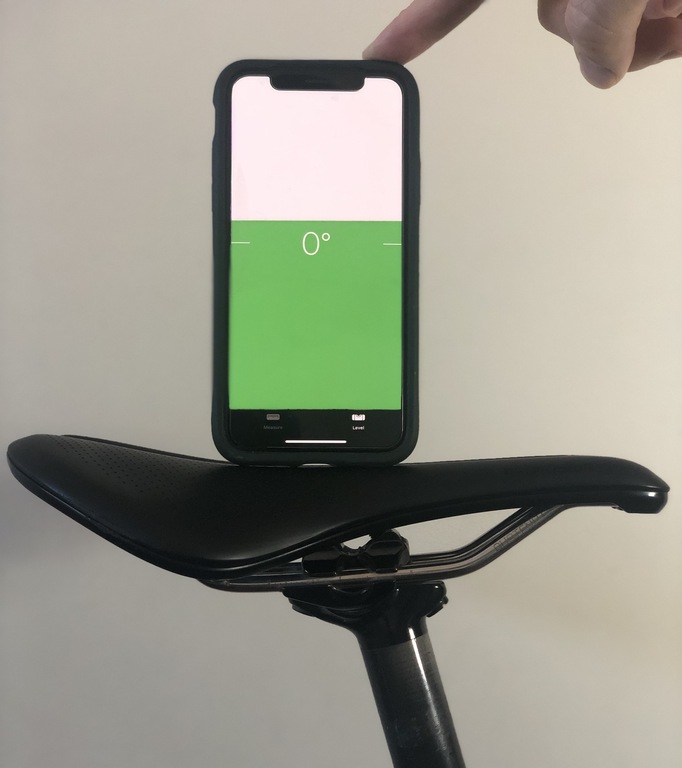
Measuring saddle tilt
2. Set Saddle Height and Fore/aft
If you’re not fully confident in your fit, now is the time to set your saddle height and fore/aft adjustments. If you previously have a significant tilt on your saddle (>+/-2°) it could be worth revisiting your saddle height. Ensuring your saddle height and fore/aft are in a good place will be key to giving you the best chance at a stable and comfortable riding position. We encourage you to check out our Seat Height Myth blog for more information, or check your position with our AI bike fit tool.
3. Set Saddle Tilt
If you’ve already set your saddle to level, you should have no problem making further tilt adjustments, but the big question is how to know if you need to adjust tilt. Sorry to disappoint if you were expecting a big complicated method at this point, but it really just comes down to feel. If you follow the simple guides below, it shouldn’t take long to find the right tilt for you.
If it feels fine, leave it. A level saddle will work just perfectly for a huge part of the riding population (when height and fore/aft are correct). Don’t feel the need to tilt it if it feels good.
If you feel pressure near the front of the saddle, this is often felt in the perineal area, tilt the saddle down, A LITTLE. No need for big adjustments 1° is often enough. Repeat as needed
*if you find yourself with persistent perineal pressure and your saddle tilt is <-3° you may want to revisit your saddle height (too high) or consider a saddle with a cutout or different shape.
If you find yourself constantly sliding forward on the saddle, tilt it up, A LITTLE. Upward tilt should generally not be necessary, though with some saddle shapes it can help. It would be very uncommon for any saddle to need more than 1° of upward tilt.
And that is really all there is to it. With saddle tilt, a little goes a long way, and most people don’t need any at all. We hope this has been helpful, and if you’d like to start dialling in your fit, you can get started right now.
Justin is a lifelong cyclist that has spent the past 15 years in the bike industry across a variety of roles. His diverse work in sales, procurement, fitting, instructing, and planning cycling infrastructure is all driven by a desire to help more people experience the wonder of cycling. He brings this breadth of experience to building MyVeloFit into a company and service that not only provides bike fits, but one that enables more people to get the most out of cycling.
Athletes from around the world use MyVeloFit to improve their cycling position. Whether you are a veteran or new to the sport, MyVeloFit can help you improve your position.
Your bike’s saddle position is the foundation for the rest of your fit. While getting the height and fore-aft positioning of the saddle ensures your overall position is off to the right start, the tilt of your saddle can often have the biggest impact on comfort if not set correctly. Many cyclists incorrectly start shopping for new saddles to improve comfort when saddle positioning can often alleviate issues.
This post will outline our recommended process for setting up your saddle tilt, to make sure you’re getting the most out of your fit.
What is Saddle Tilt?
Saddle tilt refers to how level (or not) your saddle is front to back. Tilt is typically referred to in degrees with positive measurements indicating a “nose up” position and negative degrees indicating a “nose down” position.
Saddle tilt ranges
While every seatpost will have a slightly different way it adjusts saddle tilt, there are typically one or two bolts (often the same as those used to install the saddle) which control the tilt.
For one bolt system, the bolt is loosened and some form of friction is usually used to hold the saddle at its tilt.
For two-bolt systems, controlling tilt is often easier, as micro-adjustments can be made by tightening/loosening both the front and rear bolts depending on the direction of tilt needed.
Steps To Setting Saddle Tilt
Setting saddle tilt may sound a bit daunting, but it should actually be quite simple. We think there are three key steps to finding a great saddle position, including your tilt.
Level your saddle
Set Saddle height and Fore/aft
Set Saddle Tilt
Below we’ll dig into each to give you a better idea of what to do and what you should be looking for.
1. Level Your Saddle
Any time you’re thinking about your saddle position, you should start with a level saddle. While a perfectly level saddle may not end up being your final position, it should be where you start (especially when sorting out your saddle height and fore/aft). If you’re currently riding with a high degree of tilt on your saddle (positive or negative), the need for this is likely caused by other issues in your fit. Starting with a level saddle serves as a fresh start to establish a good position on the bike.
What is Level?
There are all varieties of saddle shapes, and in this case, profiles. Some are nearly completely flat (front to back), while others have various degrees of rise at the rear of the saddle, and similarly noses that taper down. How to measure what is level may not be completely obvious depending on the shape of the saddle. For saddles with flat profiles, it is reasonably clear what level might look like, but with the curvier profiles it’s not quite as simple. To boil all saddles down to one easy approach, the key to starting level is to make sure the part of the saddle you’re sitting on is level. For most saddles this is best represented by the middle third of the saddle.
You can check your saddle tilt quite easily by using a small bubble (spirit) level or the level app on your phone and placing it on that centre third of the saddle. Be sure the ground your bike is on is also level, as you could end up with confusing outcomes if not.
If your saddle is already level move on to the next step. If not, take some time to level your saddle and keep in mind that a little goes a long way. Most of the time you’ll only need a small adjustment to make a daily large change in your saddle tilt.
Measuring saddle tilt
2. Set Saddle Height and Fore/aft
If you’re not fully confident in your fit, now is the time to set your saddle height and fore/aft adjustments. If you previously have a significant tilt on your saddle (>+/-2°) it could be worth revisiting your saddle height. Ensuring your saddle height and fore/aft are in a good place will be key to giving you the best chance at a stable and comfortable riding position. We encourage you to check out our Seat Height Myth blog for more information, or check your position with our AI bike fit tool.
3. Set Saddle Tilt
If you’ve already set your saddle to level, you should have no problem making further tilt adjustments, but the big question is how to know if you need to adjust tilt. Sorry to disappoint if you were expecting a big complicated method at this point, but it really just comes down to feel. If you follow the simple guides below, it shouldn’t take long to find the right tilt for you.
If it feels fine, leave it. A level saddle will work just perfectly for a huge part of the riding population (when height and fore/aft are correct). Don’t feel the need to tilt it if it feels good.
If you feel pressure near the front of the saddle, this is often felt in the perineal area, tilt the saddle down, A LITTLE. No need for big adjustments 1° is often enough. Repeat as needed
*if you find yourself with persistent perineal pressure and your saddle tilt is <-3° you may want to revisit your saddle height (too high) or consider a saddle with a cutout or different shape.
If you find yourself constantly sliding forward on the saddle, tilt it up, A LITTLE. Upward tilt should generally not be necessary, though with some saddle shapes it can help. It would be very uncommon for any saddle to need more than 1° of upward tilt.
And that is really all there is to it. With saddle tilt, a little goes a long way, and most people don’t need any at all. We hope this has been helpful, and if you’d like to start dialling in your fit, you can get started right now.
Justin is a lifelong cyclist that has spent the past 15 years in the bike industry across a variety of roles. His diverse work in sales, procurement, fitting, instructing, and planning cycling infrastructure is all driven by a desire to help more people experience the wonder of cycling. He brings this breadth of experience to building MyVeloFit into a company and service that not only provides bike fits, but one that enables more people to get the most out of cycling.