As bike fitters we see many issues simply caused by easy errors in setup. Sometimes just looking at the bike, even without the rider, we can tell exactly what the issues are. Often, these adjustments are made with the best intentions, or to try and solve a problem, but end up causing more harm than good.
In this post we’ll look at four of the most common easy to spot red flags we encounter. Each of these cases can signal more than one potential problem but we’ll do our best to identify the main causes and how it can relate to your fit. In this post we’re going to focus on bikes with drop bars (e.g. road, gravel, etc.), but stay tuned as we’ll tackle other bike types in the future.
The bike fit red flags we’re going to examine are as listed below:
- Excessive Saddle Tilt
- Insole, Shoe & Crank Wear
- Angled Hood Positions
- Bar Tape Wear
Excessive Saddle Tilt
Saddle tilt is one of the most common things people get wrong when adjusting their bikes. It’s often one of the first adjustments people make to try to improve the comfort of their saddle, often to try and relieve soft tissue pressure. The problem is when this adjustment is taken to the extreme. In general, a small amount of saddle tilt ( -2° to +2° ) is acceptable and useful. However, more extreme levels of tilt generally affect the stability of your hips and will have a negative impact on your comfort and performance.

Excessive nose down saddle tilt
Excessive nose down tilt is the most common red flag, and is often done to relieve pressure on the perineal region. Adjusting the saddle in this way causes a rider to slide forward on the saddle, forcing them to push back harder into the saddle through their arms. This increases pressure on the saddle and hands, often resulting in more saddle discomfort along with other issues such as hand, wrist and neck pain. Although more extreme nose down adjustments may initially relieve some discomfort, it does not place the rider in a sustainable position.
The cause of the perineal pressure riders are seeking to avoid may seem like it is related to tilt, however the root of the problem is consistently related to saddle height – it’s too high. Interestingly, a riders overall position may not need to significantly change to fix this issue, but the lower and more level saddle position allows them to distribute pressure more evenly across the saddle (and through the sit bones), providing a more stable peddling platform and relieving the perineal pressure that can ruin anyone’s ride.
For more on setting saddle tilt you can check out our full blog post here.
Insole, Shoe, & Crank Wear
Though wear and tear on your shoes, insoles and cranks is inevitable, some patterns of wear present clear indications that something is amiss. The location and type of wear on these three items of kit can tell a surprisingly detailed story about what is happening with your riding position.
Wear on all three of these pieces of equipment will typically point to issues in one or more of the following areas:
- Cleat placement
- Shoe/insole selection
- Saddle position
- Rider strength & mobility
In all of these cases the result is excess lateral movement through the pedal stroke. Though this may sound complicated, a simple process of elimination can help you pinpoint what needed to fix the issue.

Heel wear on crankarms is an indicator your fit needs work
Cleat Placement
First check your cleat placement. Many riders are intimidated by cleat placement but it’s actually quite easy to get it right. We’ve laid out our recommended method to set up your cleats here.
Shoe/insole selection
Second, you’ll want to make sure you have the right shoes and insoles. As a fitter this can be one of the harder assessments as we can’t readily see or “feel” how the shoe fits you. We can measure foot length and width, as well as navicular bone height (one of the key factors in determining insole selection) but that won’t tell us how the shoe feels to the rider.
To help determine if your shoes and insoles are a good fit for you, start by investigating how the stock insoles (the ones the shoes came with) fit your foot. The stock insoles, being made specifically for that shoe, can give us a better picture of how the shape of your feet compare to the shape of the shoe.
To get started, remove the insoles from your shoes and stand on them, making sure to put your heel in the right place. Now that you’re staring down at your feet, look for your foot overhanging off the front or sides of the insole. Toes off the front indicate your shoe is a size (or more) too small, where as your foot hanging off the side indicates the shoe likely isn’t wide enough. On the other side, if there is too much insole hanging out from underneath your foot, this is a good indication your shoes may be too big.

Insole wear can show how the fit of your shoe fit may be letting you down
A well fitted pair of insoles should have light contact throughout the arch and shouldn’t collapse under your weight outside of the shoe. This is often where stock insoles fall short, which is why we often recommend getting a set of supportive non-corrective orthotics. You can read more about this in our Feet Before Fit article.
Saddle position
Third, check your saddle height. You can use our free fit check to tell if you are in range, or our paid version for a more in depth analysis. A saddle that is either too high or too low can force the body to move in unexpected ways, which can often be the cause of lateral movement of your knee and ankle through the pedal stroke.
Rider strength & mobility
Finally, if you’ve done all three of the above steps and everything seems on track, the final cause may be your strength or mobility. Perhaps a surprise for some, but cycling can contribute to some significant muscle imbalances and tightness throughout the body. A more wholistic strength and mobility routine can do wonders to help avoid related issues. You can read more about the importance of working on on cycling specific strength and mobility exercises here.
Angled Hood Position
We’ve all seen some pretty wonky hood positions out there (and we’re not talking about the recent trends in the pro peloton). Hoods either too high or too low can both result in significant issue, generally in the hand and wrists.
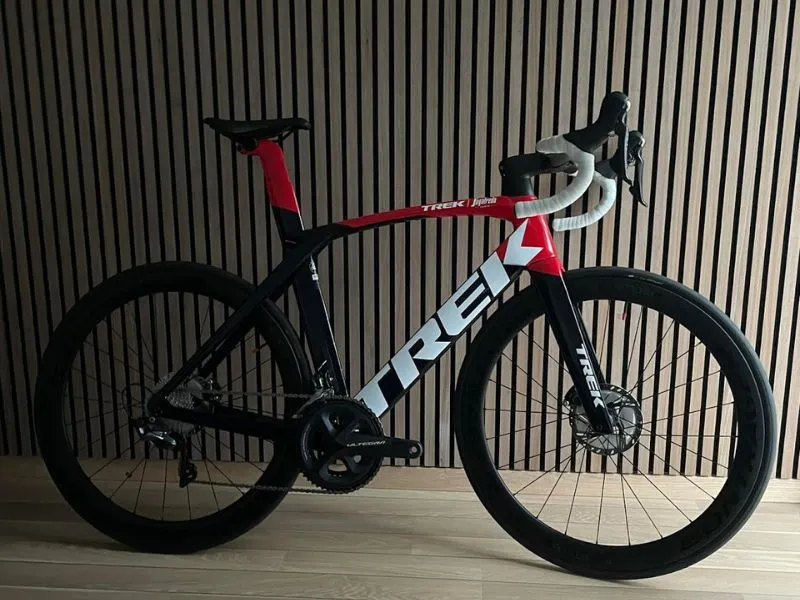
Road bike with hoods angled too far up.
Riders will often angle their hoods up to either reduce the reach or increase the height of the front end. While downward angled hood positions are generally the result of poor setup right from the bike shop or the handlebar slipping in the stem. We find it’s quite rare for someone to intentionally set a low hood position as it’s noticeably rather uncomfortable.
Though angling the hoods up slightly is the position we generally recommend, raising them excessively simultaneously puts your wrists in an awkward position (contributing to hand numbness) and creates problems with bike handling and your ability to reach the brakes.
To read more about how we recommend setting your handlebars and hoods, check out our Bicycle Hood Positioning blog post.

Hood angle can make a significant difference to comfort and safety.
Bar Tape Wear
Bar tape is essentially designed to be the soft grippy interface between your hand and the hard and slippery surface of your handlebar. By its very nature bar tape will wear out and should be replaced regularly. Though wear and tear after a season or two of riding (depending on how much you ride) is to be expected, wear that happens within a few weeks or months of new bar tape being installed is a key indicator that there may be an issue with the bike fit.
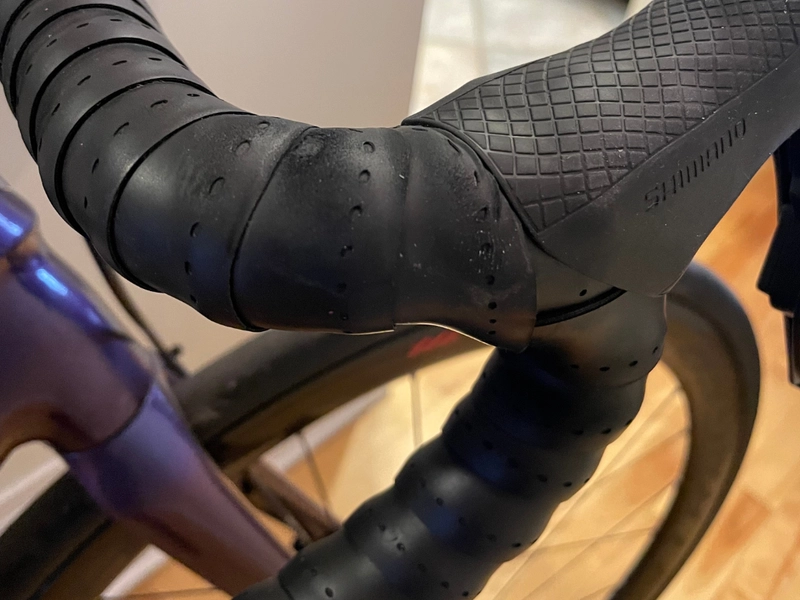
Rapid wear of bar tape can be an easy sign of a poor bike fit.
The most common type of wear we see is at the “elbow” of the handlebar. This almost always indicates the bike’s reach is too long and the rider isn’t able to comfortably reach the hoods and maintain their position.
A secondary cause of this wear pattern can be an uncomfortable saddle – often caused by the saddle being too high – which results in the rider unconsciously putting more weight on the handlebars to take weight off the saddle.
If your bar tape constantly seems to wear quickly in this spot then it’s worth reviewing your fit. Not only will you have to replace your bar tape less, but you’ll probably find a far more comfortable position on your bike. Try our Free Fit Check to see if your reach or saddle height might be the cause of these issues.

